


Using TensorFlow Object Detection API
In this tutorial, I will be training a Deep Learning model for custom object detection using TensorFlow 1.x on Google Colab. Following is the roadmap for it.
- Collect the dataset of images and label them to get their XML files.
- Install the TensorFlow Object Detection API.
- Generate the TFRecord files required for training. (need generate_tfrecord.py script and CSV files for this)
- Edit the model pipeline config file and download the pre-trained model checkpoint.
- Train and evaluate the model.
I am training a model for face mask detection. This is done in 17 steps mentioned in the section below:
( But first ✅Subscribe to my YouTube channel ???????? https://bit.ly/3Ap3sdi ????????)
- Install TensorFlow 1.x
- Import dependencies
- Create customTF1, training, and data folders in your google drive
- Create and upload your image files and XML files
- Upload the generate_tfrecord.py file to the customTF1 folder in your drive
- Mount drive and link your folder
- Clone the TensorFlow models git repository & Install TensorFlow Object Detection API
- Test the model builder
- Navigate to the data folder on your drive and unzip the images.zip and annotations.zip files into the data folder
- Create test_labels & train_labels
- Create CSV and “label_map.pbtxt” files
- Create ‘train.record’ & ‘test.record’ files
- Download pre-trained model checkpoint
- Get the model pipeline config file, make changes to it, and put it inside the data folder
- Load Tensorboard
- Train the model
- Test your trained model
HOW TO BEGIN?
- Open my Colab notebook on your browser.
- Click on File in the menu bar and click on Save a copy in drive. This will open a copy of my Colab notebook on your browser which you can now use.
- Next, once you have opened the copy of my notebook and are connected to the Google Colab VM, click on Runtime in the menu bar and click on Change runtime type. Select GPU and click on save.

LET’S BEGIN !!!
1) Install TensorFlow 1.x
#install tensorflow 1.15
!pip install tensorflow==1.15

#Check tensorflow version
import tensorflow as tf
print(tf.__version__)
2) Import dependencies
import os
import glob
import xml.etree.ElementTree as ET
import pandas as pd
3) Create customTF1, training, and data folders in your google drive
First, create a folder named customTF1 in your google drive.
Next, create another folder named training inside the customTF1 folder ( training folder is where the checkpoints will be saved during training ).
Finally, create another folder named data inside the customTF1 folder.
4) Create and upload your image files and XML files.
Create a folder named images for your custom dataset images and create another folder named annotations for their corresponding XML files.
Next, create their zip files and upload them to the customTF1 folder in your drive.
NOTE: Make sure all the image files have their extension as “.jpg” only. Other formats like “.png “, “.jpeg” or even “.JPG” will give errors since the generate_tfrecord and xml_to_csv scripts here have only “.jpg” in them. If you have other format images, then make changes in the scripts accordingly.
For Datasets, you can check out my Dataset Sources at the bottom of this article in the credits section.
Collecting Images Dataset and labeling them to get their PASCAL_VOC XML annotations.
Labeling your Dataset
Input image example (Image1.jpg)

You can use any software for labeling like the labelImg tool.

I use an open-source labeling tool called OpenLabeling with a very simple UI.


Click on the link below to know more about the labeling process and other software for it:
NOTE : Garbage In = Garbage Out. Choosing and labeling images is the most important part. Try to find good-quality images. The quality of the data goes a long way toward determining the quality of the result.
The output PASCAL_VOC labeled XML file looks like as shown below:


5) Upload the generate_tfrecord.py file to the customTF1 folder in your drive.
You can find the generate_tfrecord.py file here
6) Mount drive and link your folder
#mount drive
from google.colab import drive
drive.mount('/content/gdrive')

# this creates a symbolic link so that now the path /content/gdrive/My Drive/ is equal to /mydrive
!ln -s /content/gdrive/My Drive/ /mydrive

#list the contents in the drive
!ls /mydrive
7) Clone the TensorFlow models git repository & Install TensorFlow object detection API
Clone the TensorFlow models’ repository in the Colab VM
!git clone --q https://github.com/tensorflow/models.gitInstall TensorFlow Object Detection API as instructed on the official TensorFlow Documentation page here
#navigate to /models/research folder to compile protos
%cd models/research

# Compile protos.
!protoc object_detection/protos/*.proto --python_out=.

# Install TensorFlow Object Detection API.
!cp object_detection/packages/tf1/setup.py .
!python -m pip install .

#Dont have to use the --use-feature=2020-resolver as it is already the deafault now
8) Test the model builder
!python object_detection/builders/model_builder_tf1_test.py9) Navigate to the data folder on your drive and unzip the images.zip and annotations.zip files into the data folder
Navigate to /mydrive/customTF1/data/
%cd /mydrive/customTF1/data/Unzip the images.zip and annotations.zip files into the data folder
# unzip the datasets and their contents so that they are now in /mydrive/customTF1/data/ folder

!unzip /mydrive/customTF1/images.zip -d .
!unzip /mydrive/customTF1/annotations.zip -d .
10) Create test_labels & train_labels
Current working directory is /mydrive/customTF1/data/
Divide annotations into test_labels(20%) and train_labels(80%).


11) Create the CSV files and the “label_map.pbtxt” file
Current working directory is /mydrive/customTF1/data/
Run xml_to_csv script below to create test_labels.csv and train_labels.csv
This script also creates the label_map.pbtxt file using the classes mentioned in the XML files.


The 3 files that are created i.e. train_labels.csv, test_labels.csv, and label_map.pbtxt look like as shown below:


The train_labels.csv contains the name of all the train images, the classes in those images, and their annotations.
The test_labels.csv contains the name of all the test images, the classes in those images, and their annotations.
The label_map.pbtxt file contains the names of the classes from your labeled XML files.
NOTE: I have 2 classes i.e. “with_mask” and “without_mask”.
Label map id 0 is reserved for the background label.
12) Create train.record & test.record files
Current working directory is /mydrive/customTF1/data/.
Run the generate_tfrecord.py script to create train.record and test.record files.
#Usage:
#!python generate_tfrecord.py output.csv output_pb.txt /path/to/images output.tfrecords

#FOR train.record
!python /mydrive/customTF1/generate_tfrecord.py train_labels.csv  label_map.pbtxt images/ train.record

#FOR test.record
!python /mydrive/customTF1/generate_tfrecord.py test_labels.csv  label_map.pbtxt images/ test.record
If everything goes well, you will see the following output :


The total number of image files is 1370. Since we divided the labels into two categories viz. train_labels(80%) and test_labels(20%), the number of files for “train.record” is 1096, and the number of files for “test.record” is 274.
13) Download pre-trained model checkpoint
Current working directory is /mydrive/customTF1/data/
You can choose any model for training depending upon your data and requirement. Read this blog for more info on this.
In this tutorial, I will use the ssd_mobilenet_v2_coco model.
A list of detection checkpoints for TensorFlow 1.x can be found here. Let’s download the ssd_mobilenet_v2_coco_2018_03_29.tar.gz checkpoint for the model above.
#Download the pre-trained model ssd_mobilenet_v2_coco_2018_03_29.tar.gz into the data folder & unzip it

!wget http://download.tensorflow.org/models/object_detection/ssd_mobilenet_v2_coco_2018_03_29.tar.gz
!tar -xzvf ssd_mobilenet_v2_coco_2018_03_29.tar.gz
14) Get the model pipeline config file, make changes to it and put it inside the data folder
Download ssd_mobilenet_v2_coco.config from /content/models/research/object_detection/samples/configs/ folder. Make the required changes to it and upload it to the /mydrive/customTF1/data folder.
OR
Edit the config file from /content/models/research/object_detection/samples/configs/ in Colab VM and copy the edited config file to the /mydrive/customTF1/data folder.
You can also find the pipeline config file inside the model checkpoint folder we just downloaded in the previous step.
You need to make the following changes:
- num_classes to the number of your classes.
- test.record path, train.record path & labelmap path to the paths where you have created these files (paths should be relative to your current working directory while training).
- fine_tune_checkpoint to the path where the downloaded checkpoint from step 13 is.
- fine_tune_checkpoint_type with value classification or detection depending on the type.
- batch_size to any multiple of 8 depending upon the capability of your GPU. (eg:- 24,128,…,512). The better the GPU capability, the higher you can go. Mine is set to 64. Mine is set to 24.
- num_steps to the number of steps you want the detector to train.
Max batch size= available GPU memory bytes / 4 / (size of tensors + trainable parameters)
Next, copy the edited config file.
# copy the edited config file from the samples/configs/ directory to the data/ folder in your drive
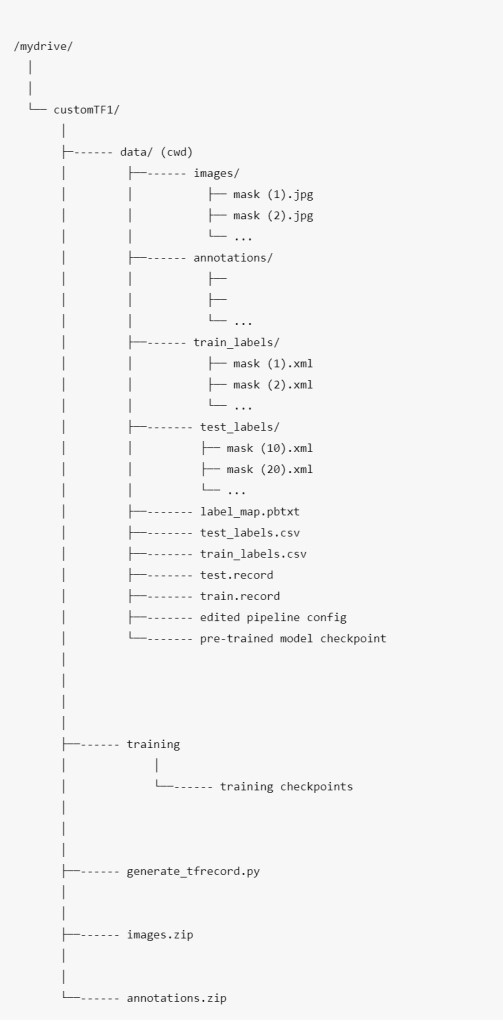
!cp /content/models/research/object_detection/samples/configs/ssd_mobilenet_v2_coco.config /mydrive/customTF1/data/The workspace at this point:

There are many data augmentation options that you can add. Check the full list here. For beginners, the above changes are sufficient.
Data Augmentation Suggestions (optional)
First, you should train the model using the sample config file with the above basic changes and see how well it does. If you are overfitting, then you might want to do some more image augmentations.
In the sample config file: random_horizontal_flip & ssd_random_crop are added by default. You could try adding the following as well:
(Note: Each image augmentation will increase the training time drastically)
- from train_config {}:
data_augmentation_options {
    random_adjust_contrast {
    }
  }
  data_augmentation_options {
    random_rgb_to_gray {
    }
  }
  data_augmentation_options {
    random_vertical_flip {
    }
  }
  data_augmentation_options {
    random_rotation90 {
    }
  }
  data_augmentation_options {
    random_patch_gaussian {
    }
  }
2. In model {} > ssd {} > box_predictor {}: set use_dropout to true This will help you to counter overfitting.
3. In eval_config : {} set the number of testing images you have in num_examples and remove max_eval to evaluate indefinitely
eval_config: {
  num_examples: 274 # set this to the number of test images we divided earlier
  num_visualizations: 20 # the number of visualization to see in tensorboard
}
15) Load Tensorboard
%load_ext tensorboard
%tensorboard --logdir '/content/gdrive/MyDrive/customTF1/training'
16) Train the model
Navigate to the object_detection folder in Colab VM
%cd /content/models/research/object_detectionTraining & evaluation using model_main.py
Run the following command from the object_detection directory
!python model_main.py --pipeline_config_path=/mydrive/customTF1/data/ssd_mobilenet_v2_coco.config --model_dir=/mydrive/customTF1/training --num_train_steps=200000 --sample_1_of_n_eval_examples=1 --alsologtostderr
where pipeline_config_path points to the pipeline config file and model_dir points to the directory in which training checkpoints and events will be written. Note that this binary will interleave both training and evaluation. The num_train_steps is the number of steps you want your model to train for. The default is 200000 in the mobilenet_ssd_v2_coco.config file. You can either set a different value here in the command or just change it in the config file.
NOTE :
For best results, you should stop the training when the loss is less than 1 if possible, else train the model until the loss does not show any significant change for a while. You can reduce the number of steps to 50000 and check if the loss goes below 1. If not, then you can retrain the model with a higher number of steps.
The loss will vary for different models. MobileNet-SSD starts with a loss of about 15 to 20 and should be trained until the loss is consistently under 1. Ideally, we want the loss to be as low as possible but we want to make sure the model is not over-fitting. Loss between 0.5 and 1 seems to give good results.
The output after running the above command will normally look like it has “frozen”, but DO NOT rush to cancel the process. The training outputs logs only every 100 steps by default, therefore if you wait for a while, you should see a log for the loss at step 100. The time you should wait can vary greatly, depending on whether you are using a GPU and the chosen value for batch_size in the config file, so be patient.
RETRAINING THE MODEL ( in case you get disconnected )
If you get disconnected or lose your session on Colab VM, you can start your training where you left off as the checkpoint is saved on your drive inside the training folder. To restart the training simply run steps 1, 2, 6, 7, 8, 15, and 16.
Note that since we have all the files required for training like the record files, our edited pipeline config file, the label_map.pbtxt file, and the model checkpoint folder, therefore we do not need to create these again.
The training automatically restarts from the last trained checkpoint itself.
However, if you see that it doesn’t restart training from the last checkpoint you can make 1 change in the pipeline config file. Change fine_tune_checkpoint to where your latest trained checkpoints have been written and have it point to the latest checkpoint as shown below:
fine_tune_checkpoint: "/mydrive/customTF1/training/model.ckpt-xxxx" (where model.ckpt-xxxx is the latest checkpoint)
17) Test your trained model
Export inference graph
Current working directory is /content/models/research/object_detection
!python export_inference_graph.py --input_type image_tensor --pipeline_config_path /mydrive/customTF1/data/ssd_mobilenet_v2_coco.config --trained_checkpoint_prefix /mydrive/customTF1/training/model.ckpt-141649 --output_directory /mydrive/customTF1/data/inference_graphTest your trained Object Detection model on images
Current working directory is /content/models/research/object_detection
This step is optional.
# Different font-type and font-size for labels text

!wget https://freefontsdownload.net/download/160187/arial.zip
!unzip arial.zip -d .

%cd utils/
!sed -i "s/font = ImageFont.truetype('arial.ttf', 24)/font = ImageFont.truetype('arial.ttf', 50)/" visualization_utils.py
%cd ..
Test your trained object detection model
- Make changes in lines 30 and 34. Line 30 is the number of classes and line 34 is the path to your test images folder.
- You don’t have to change paths in lines 41 and 42 if you have created all folders and files according to this tutorial.
NOTE:
The dataset I have collected for mask detection contains mostly close-up images. For more long-shot images you can search online. There are many sites where you can download labeled and unlabeled datasets. I have given a few links at the bottom under Dataset Sources. I have also given a few links for mask datasets. Some of them have more than 10,000 images.
Though there are certain tweaks and changes we can make to our training config file or add more images to the dataset for every type of object class through augmentation, we have to be careful so that it does not cause overfitting which affects the accuracy of the model.
For beginners, you can start simply by using the config file I have uploaded on my GitHub. I have also uploaded my mask images dataset along with the PASCAL_VOC format labeled text files, which although might not be the best but will give you a good start on how to train your own custom object detector using an SSD model. You can find a labeled dataset of better quality or an unlabeled dataset and label it yourself later.


My GitHub
Files for training
Train object detection model TF 1.x
My Mask Dataset
https://www.kaggle.com/techzizou/labeled-mask-dataset-pascal-voc-format
My Colab notebook for this
Check out my Youtube Video for this

CREDITS
Documentation / References
- Tensorflow Introduction
- Tensorflow Models Git Repository
- TensorFlow Object Detection API Repository
- TF Object Detection Documentation
- TF1 installation guide
- TensorFlow 1 Detection Model Zoo
- Training and Evaluation with TensorFlow 1
- Tensorflow tutorials
- Tensorflow Hub
- TensorFlow Hub Object Detection Colab
- Object detector tutorial
Dataset Sources
You can download datasets for many objects from the sites mentioned below. These sites also contain images of many classes of objects along with their annotations/labels in multiple formats such as the YOLO_DARKNET txt files and the PASCAL_VOC xml files.
Mask Dataset Sources
More Mask Datasets
- Prasoonkottarathil Kaggle (20000 images)
- Ashishjangra27 Kaggle (12000 images )
TROUBLESHOOTING
If you get a NumPy error like “Cannot convert a symbolic Tensor (cond_2/strided_slice:0) to a numpy array”, you can fix it by downgrading your NumPy version, uninstalling and installing pycocotools. Run the 3 commands below:
!pip install numpy==1.19.5

!pip uninstall pycocotools
!pip install pycocotools