

Using Google Colab
In this tutorial, we will be training a custom detector for mask detection using YOLOv8 PyTorch implementations
HOW TO BEGIN?
- First, ✅Subscribe to my YouTube channel ???????? https://www.youtube.com/c/techzizou ????????
- Open my Colab notebook on your browser.
- Click on File in the menu bar and click on Save a copy in drive. This will open a copy of my Colab notebook on your browser which you can now use.
- Next, once you have opened the copy of my notebook and are connected to the Google Colab VM, click on Runtime in the menu bar and click on Change runtime type. Select GPU and click on save.
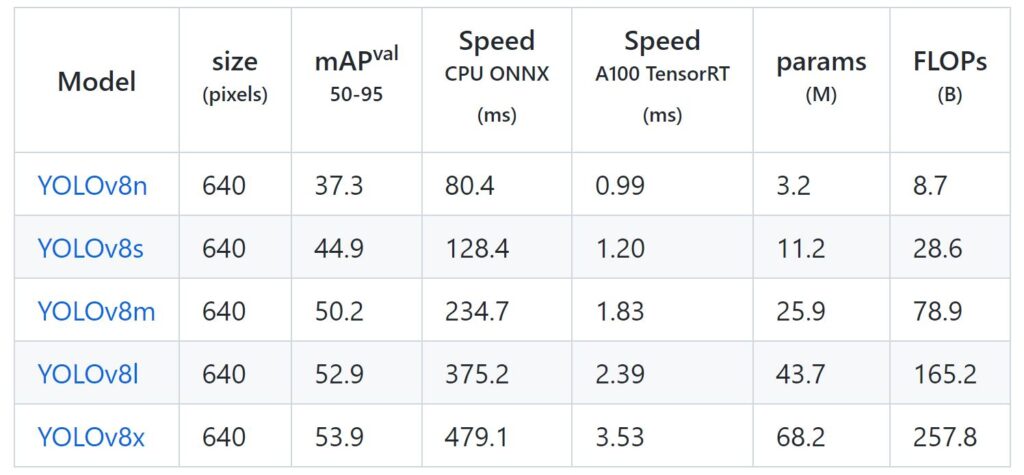
Use any one of the following models:
In this tutorial, we will be using the small yolov8 i.e. YOLOv8s

Follow these 7 steps to train your custom YOLOv8 object detector:
- 1) Mount the drive
- 2) Clone the
ultralyticsofficial git repository and rename the ultralytics folder to yolov8 for simplicity - 3) Navigate to the yolov8 folder, install PyTorch and all the required libraries & dependencies and next install the ultralytics package
- 4) Create & upload the necessary files we need for training a custom detector
- 5) Load Tensorboard to visualize training metrics
- 6) Train the Model
- 7) Test the trained model
NOTE: If you get disconnected or lose your session for some reason you have to run steps 1,3 and 5 again.
1) Mount the drive
#mount drive
%cd ..
from google.colab import drive
drive.mount('/content/gdrive')

# this creates a symbolic link so that now the path /content/gdrive/My\ Drive/ is equal to /mydrive
!ln -s /content/gdrive/My\ Drive/ /mydrive
# list the contents of /mydrive
!ls /mydrive
2) Clone the ultralytics official git repository and rename the ultralytics folder to yolov8 for simplicity
Clone the ultralytics yolov8 repository
# Git clone method (for development)
!git clone https://github.com/ultralytics/ultralytics
%pip install -qe ultralytics
Rename the folder
#Rename the ultralytics folder to yolov8
%mv ultralytics yolov8
3) Navigate to the yolov8 folder, install PyTorch and all the required libraries & dependencies and next install the ultralytics package
#Navigate to /mydrive/yolov8
%cd /mydrive/yolov8
!pip install -r requirements.txt
Install ultralytics package
# Pip install method (recommended)
%pip install ultralytics
import ultralytics
ultralytics.checks()
#Check if pytorch installed
import torch
import os
from IPython.display import Image, clear_output  # to display images

print(f"Setup complete. Using torch {torch.__version__} ({torch.cuda.get_device_properties(0).name if torch.cuda.is_available() else 'CPU'})")
4) Create & upload the following files which we need for training a custom detector
a. Labeled Custom Dataset
b. process_yolov8.py file (to split dataset into train-val folders for training)
c. data.yaml file
CHANGE I have uploaded my custom files on GitHub. I am working with 2 classes i.e. with_mask and without_mask
4(a) Upload the Labeled custom dataset obj.zip file to the yolov8 folder on your drive and unzip it
Create the zip file obj.zip from the obj folder containing both the folders’ images and labels. The images folder has all the input images “.jpg” files and the labels folder has their corresponding YOLO format labeled “.txt” files.
Upload the zip file to the yolov8 folder on your drive.
Labeling your Dataset
Input image example (Image1.jpg)


You can use any software for labeling like the labelImg tool.

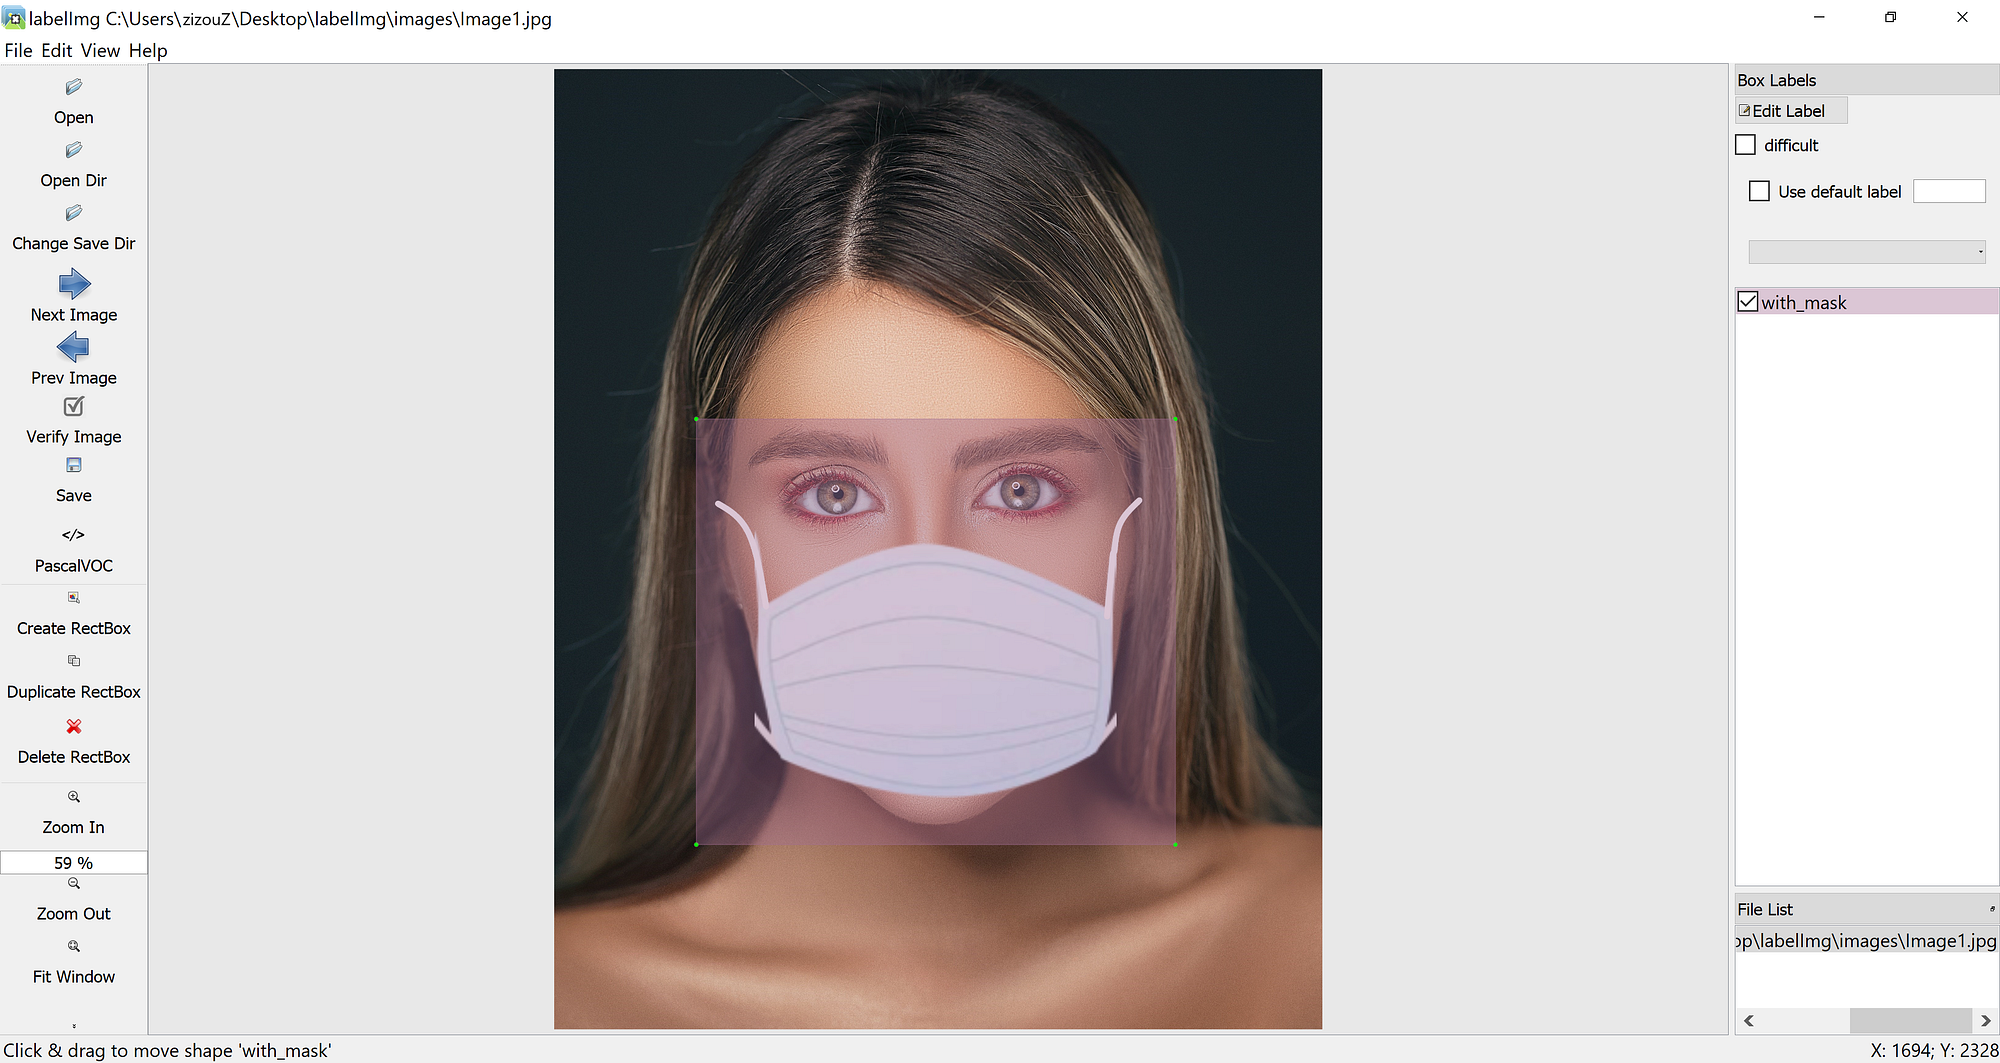
Click on the link below to know more about the labeling process and other software for it:
NOTE: Garbage In = Garbage Out. Choosing and labeling images is the most important part. Try to find good-quality images. The quality of the data goes a long way toward determining the quality of the result.
The output YOLO format TXT label file looks as shown below.


Unzip the obj.zip dataset and its contents
!unzip -q /mydrive/yolov8/obj.zip -d /mydrive/yolov8
Note: You can also use other methods to get your dataset like the curl command to download the dataset from Roboflow. Visit Roboflow and go to the Public Datasets tab for more datasets.
curl -L "https://public.roboflow.ai/ds/YOUR-API-KEY-HERE" > roboflow.zip; unzip roboflow.zip; rm roboflow.zip
*Since I already have a simple dataset archive ready I will be using that.
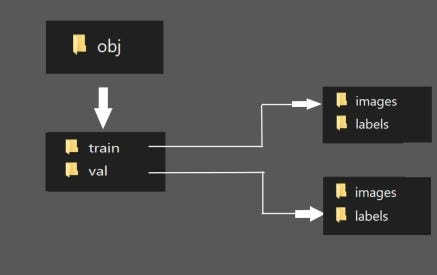
4(b) Split the dataset images and labels into train-val. Run the “process_yolov8.py” python script to create the train & val folders inside the yolov8/obj directory
Here the train folder will have 80% of the dataset images and their labels while the val folder will have 20% of the dataset images and their labels. The test images folder is optional.
The split folders will be in the following order:

Run the process script
# run process_yolov8.py ( this creates the train and val folders containing the images and labels folder )
!python process_yolov8.py

# list the contents of obj folder to check if the train and val folders have been created
!ls obj
4(c) Create your data.yaml file and upload it to the yolov8 folder in your drive
This file contains the path to your train and val images. We created these 2 text folders in the previous step.
This file also contains the number of classes (nc) and their names.
data.yaml file is shown below:
# train and val data as 1) directory: path/images/, 2) file: path/images.txt, or 3) list: [path1/images/, path2/images/]

train: /mydrive/yolov8/obj/train/images/
val: /mydrive/yolov8/obj/test/images/
#test: optional

nc: 2
names: ['with_mask', 'without_mask']
5) Load Tensorboard to visualize training metrics
#@title Select YOLOv8 ???? logger {run: 'auto'}
logger = 'TensorBoard' #@param ['ClearML', 'Comet', 'TensorBoard']
if logger == 'ClearML':
  %pip install -q clearml
  import clearml; clearml.browser_login()
elif logger == 'Comet':
  %pip install -q comet_ml
  import comet_ml; comet_ml.init()
elif logger == 'TensorBoard':
  %load_ext tensorboard
  %tensorboard --logdir runs/train
6) Train the model
We can pass the following arguments in the train command:
- imgsz: define input image size.
- batch: determine batch size
- epochs: define the number of training epochs.
- data: set the path to our yaml file
- name: experiment name
- project: project name
- model: specify the path to the yolov8 prtrained model weights. You can use the weights of whichever model you want to train.
- yolov8n.pt
- yolov8s.pt
- yolov8m.pt
- yolov8l.pt
- yolov8x.pt
- ** You can also use “.yaml” models to train from scratch for eg:- yolov8n.yaml
The YOLOv8 framework automatically downloads the weights specified here in this command.
NOTE: There are many more parameters you can give here. Read about them here: https://docs.ultralytics.com/cfg/#training or in the default.yaml file here: https://github.com/ultralytics/ultralytics/blob/main/ultralytics/yolo/cfg/default.yaml
!yolo task=detect mode=train model=yolov8s.pt data=data.yaml epochs=100 imgsz=640 batch=8 workers=1
Retraining from the last saved checkpoint
!yolo task=detect mode=train model=/mydrive/yolov8/runs/detect/train/weights/last.pt data=data.yaml epochs=100 imgsz=640 batch=8
7) Test the trained model
Validate your model
!yolo task=detect mode=val model=/mydrive/yolov8/runs/detect/train/weights/best.pt data=data.yaml
DETECTION ON IMAGES
Here we use predict mode. You can read about the various prediction parameters here: https://docs.ultralytics.com/cfg/#prediction or in the default.yaml file here: https://github.com/ultralytics/ultralytics/blob/main/ultralytics/yolo/cfg/default.yaml
Run Detector
!yolo task=detect mode=predict model=/mydrive/yolov8/runs/detect/train/weights/best.pt conf=0.4 source=/mydrive/mask_test_images save=True
Display the image outputs
#display inference on ALL test images
import glob
from IPython.display import Image, display
for imageName in glob.glob('/mydrive/yolov8/runs/detect/exp/*.jpg'): #assuming JPG
    display(Image(filename=imageName))
    print("\n")
DETECTION ON VIDEOS
Run Detector
!yolo task=detect mode=predict model=/mydrive/yolov8/runs/detect/train/weights/best.pt conf=0.3 source=/mydrive/mask_test_videos/test.mp4 save=True
                                                                                                            #  0  # webcam
                                                                                                            #  img.jpg  # image
                                                                                                            #  vid.mp4  # video
                                                                                                            #  path/  # directory
                                                                                                            #  path/*.jpg  # glob
                                                                                                            #  'https://youtu.be/Zgi9g1ksQHc'  # YouTube
                                                                                                            #  'rtsp://example.com/media.mp4'  # RTSP, RTMP, HTTP stream
(OPTIONAL STEP) CONVERSION
CONVERT TO TFLITE, ONNX, TORCHSCRIPT, AND TENSORFLOW MODEL
Export a YOLOv8 model to any supported format with the format argument, i.e. format=onnx.

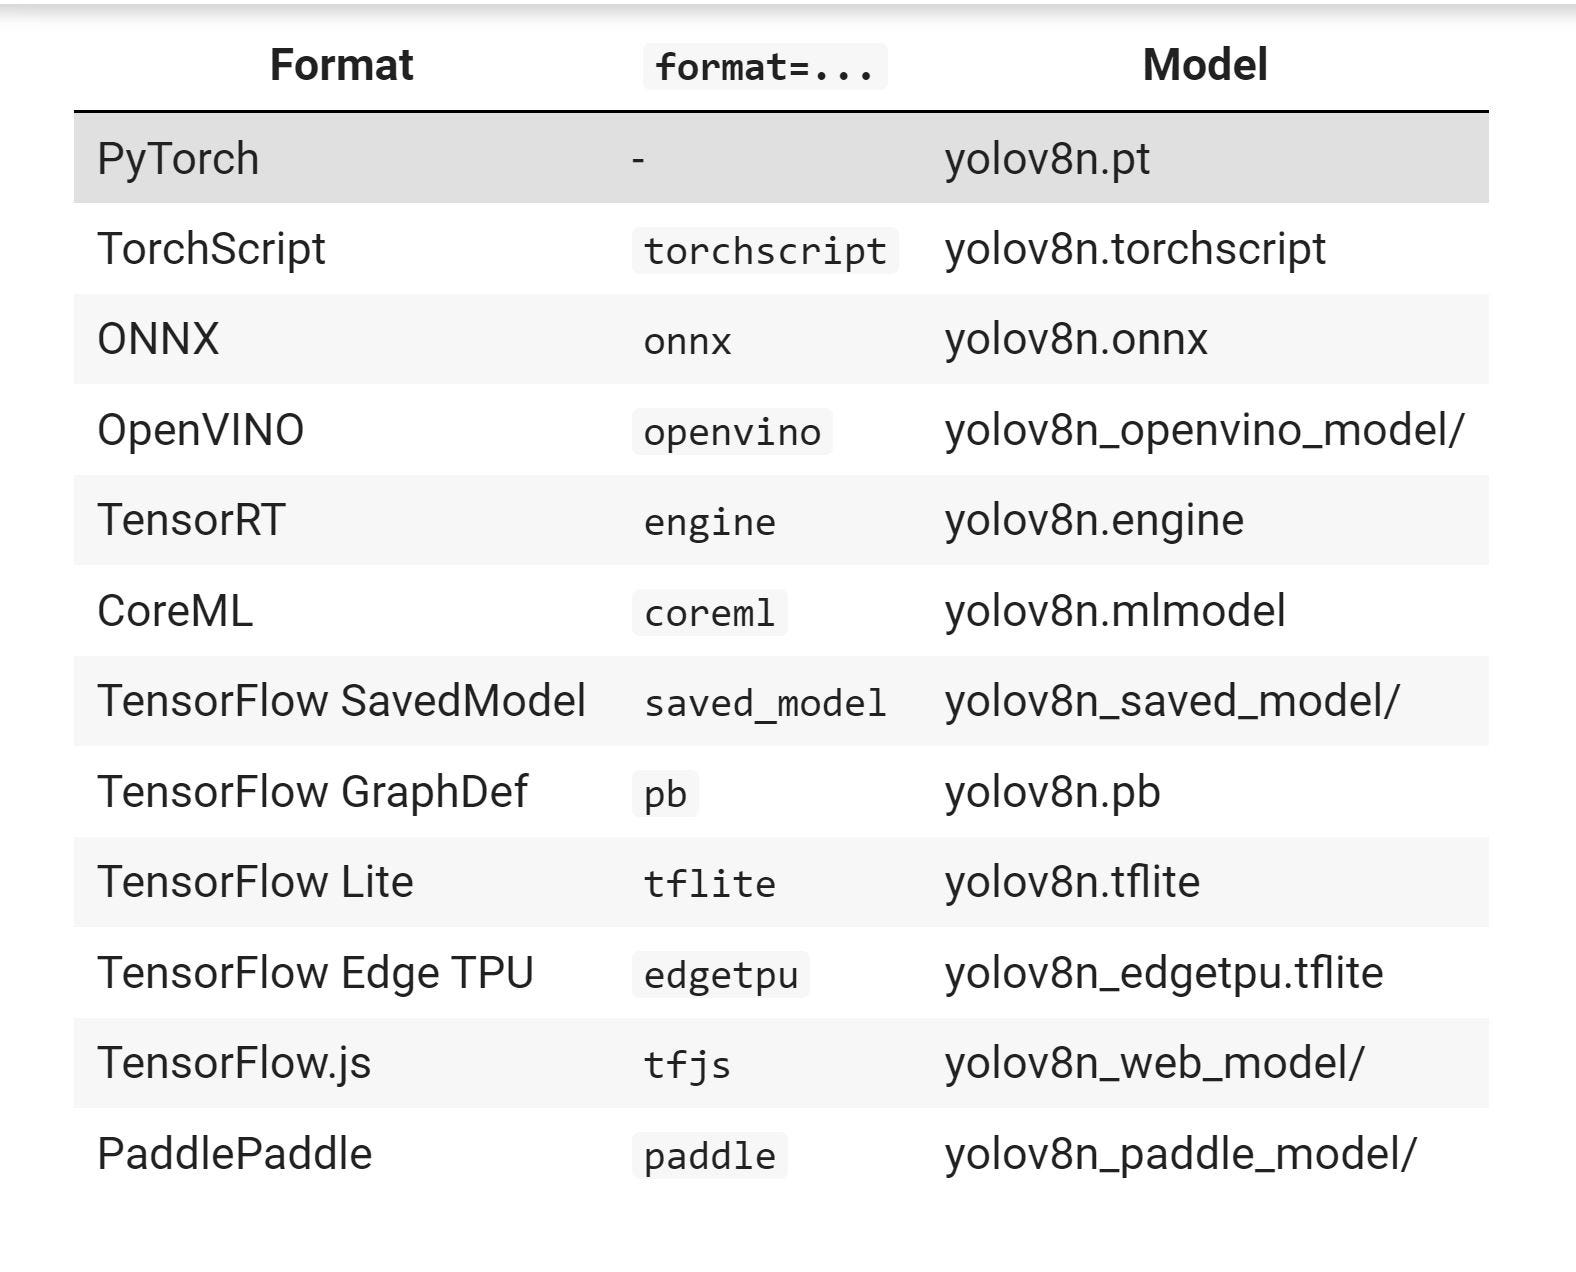
Convert using the export mode parameter command in yolov8 ultralytics (Read more about export command here)
Install Requirements
#    $ pip install -r requirements.txt coremltools onnx onnx-simplifier onnxruntime openvino-dev tensorflow-cpu  # CPU
#    $ pip install -r requirements.txt coremltools onnx onnx-simplifier onnxruntime-gpu openvino-dev tensorflow  # GP
Export
!yolo mode=export model=/mydrive/yolov8/runs/detect/train/weights/best.pt format=onnx
That’s it for YOLOv8!
References
https://github.com/ultralytics/ultralytics
https://blog.roboflow.com/how-to-train-yolov8-on-a-custom-dataset/